Wednesday, April 17, 2013

Kitchen update: Toaster Redo


I've been busy working on my kitchen and living room and soon you will see more, I'm almost done. I rent this beautiful house ,so unfortunately I can't paint and if you know me you know how much that is killing me. After our first white winter here in Utah I'm in need of color, so nothing is safe in my house right now and this toaster was the first thing to get taken over by my spray can.


Here is what I have to work with it's not bad but it needs some color. That yellow vase by the sink is what started it all. My friend gave it to me before she moved to sunnier pastures....take me with you. I didn't realize how much I liked yellow.


Look at Mr. Toaster just sitting there so sad, so white, he didn't see me coming.


I tapped up the parts I didn't want yellow and sprayed away with Krylon Sun Yellow. I was so glad that it came out and didn't turn out to be a fail. My husband came home and right away said "WOW!, that's yellow!" Mr Toaster is much happier now, wait and see what else fell victim to my spray can.


Image Map


Sunday, April 14, 2013

White Chocolate Popcorn


Here is another one of my favorite and easy peasy treats to make. It is another one of my most requested to make, because it taste like heaven. Now, I'm not a white chocolate fan, but I love this popcorn, it is a perfect salty & sweet snack.


Ingredients

Microwavable popcorn
White chocolate (I like to use the Wilson candy melts)

Yep, that is it folks 2 ingredients already easy. I like to use 2 bags of popcorn with 1 bag of candy melts.


Step 1.  Pop the popcorn per popcorn directions. Empty into large bowl and be sure to keep an eye out for unpopped kernels and remove them. You don't want to cover them with white chocolate and later bite into them, not fun.


Step 2. Melt chocolate. I melt mine in the microwave by putting chocolate into glass microwavable safe measuring cup. I then put into microwave at 15 second intervals taking it out each time and giving it a good mix till it is completed melted.


Note: You always want to give it a good mix because sometimes it does't look like it is melted until you mix it, as in the picture above. Trust me I learned  the hard way when I first over cooked my chocolate, there is no saving it once you over do it.


Look how yummy and smooth it is, refrain from licking the spoon, that comes when you are done.


Step 3. Pour chocolate onto popcorn.


Step 4. Give it a good mix.


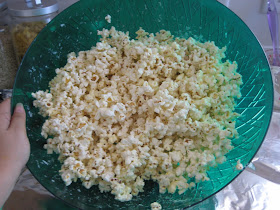
Step 5. Lay out popcorn on aluminum foil or wax paper to dry. When dry break apart into to serving dish and enjoy.


Be warned this stuff is like crack. I had to hold off my kids so I could get a picture of it.


Image Map


Wednesday, April 10, 2013

Activity Day Prayer Bracelet


What is a Prayer Bracelet (or Personal Progress Bracelet)?

It is a beautiful beaded memory wire bracelet that has a charm that you can move around to keep track of doing daily spiritual task. There are letter beads on the bracelet that stand for the spiritual tasks: MP = Morning Prayer, SS = Scripture Study, WJ = Write in Journal, EP = Evening Prayer


One Of my callings in my church is Activity Days. Which is a class we hold for girls from ages 8-12. We meet twice a month and have an activity that pertains to one of the handbook topics. April is my month and I have the topic of Learning and Living the Gospel. I decided to make this beautiful bracelet. I have made it before for Young Women's camp and called it a Personal Progress Bracelet, so if you are called to YW this is a great project for you too. I thought this applied just as well for the Activity Day girls.


Supplies

Beads (Hobby Lobby, they have great color choices and one bag works great per girl)
Letter beads (Hobby Lobby, they sell a bag of one letter)
Memory wire (Michaels, They sell a longer piece then HL for cheaper, You can get 20 bracelets from one)
Head pin (Michaels)
Charm Clasp (Hobby Lobby)

Look at the beautiful color choices. Makes it hard to pick just one.


Lets get started. Like I said this is my second time doing this craft so always give the girls bowls to hold the beads and a plate to work on, keeps from beads going everywhere. I like to prep this project by putting supplies for each bracelet in a ziploc bag.


I cut the memory wire and curl the one side so the girls can start beading.


I hand the bag of supplies to each of the girls and have them make the charm first.

Charm

Step 1 Feed beads onto the charm pin.
Step 2 Feed clasp onto the charm pin.
Step 3 I have the girls tell me when they are done and I go around and loop the pin.
Step 4 As you can see the clasp is in the loop.


Bracelet

They simple feed the beads and letter beads onto the memory wire as desired. I have the girls tell me when they are done and I loop the other end of the memory wire to finish the bracelet.


Here are the girls making the bracelets. This is a great and easy project for a group of girls. They all had so much fun making them. I love this project cause it not only a cute bracelet it also has a spirtual purpose. Hopefully for at least a week it reminds and inspires them to pray, read their scriptures and write in their journals. Like I said before this can be used for Young Women and Activity Days.


Have fun crafting.


Image Map


Monday, April 8, 2013

Chevron Baby Girl Quilt


I'm so excited I finished my very first real quilt and it wasn't a Pinertest fail. Yeahhhhhh. I've had a boy version of this quilt pined on my Pinertest for awhile now and have been wanting to try it. So, when I heard I had some nieces on the way I decided to jump right in and give it a try.

The quilt and free pattern: Mod Chevron Baby Quilt by Rashida Coleman-Hale.

I wanted to share some of the obstacles I had to overcome in case you have the same.

Fabric choice

What I love so much about this quilt is that it's baby without being too nursery looking. It has a bit of a retro feel. Now for me I live in a small town and we don't have a fancy fabric store. I'm thankful we have a JoAnn but trying to find like girl fabrics was an obstacle. Rashida also has 12 different fabrics which at first overwhelmed me. This is what I did to chose my fabric and how much I bought of each.

I first started by looking for a couple of colorful patterns that went together. Right away my eye was drawn to this fabric. It was perfect cause it has lots of colors to pull from. (I loved how it was girly without having pink or being to nursery like the original quilt)


I then used this fabric to find 2 complimentary fabrics and I fond these 2.


So far so good. I then took my original fabric and started to search for more solid colored fabrics. This is what I found. I was lucky to first find the purple paisley and then find they had the same paisley in green.


Yeah, I was happy with that so instead of 11 pattern fabrics in the original quilt I have 7. I purchased 1/4 yard of each except the purple, I purchased 1/2 yard. (Because this is the fabric I used as the middle big line, so I needed more of that fabric. everything else I had more then enough with 1/4 yard)

Then I searched for the base solid fabric and that was tough, but I found the beige fabric with a light pattern. I purchased 1 1/2 yards of that. So here is all my fabrics together aren't they pretty I couldn't wait to get home and transform them into a quilt.


What you need:

Neutral fabric 1 1/4 yard (25 squares)
6 Pattern fabrics 1/4 yard
1 Pattern Fabric 1/2 yard (6 squares for middle line)
Backing Fabric 1/2 yard (no piecing required)
square ruler 6 1/2" or larger
Pencil
Batting


Lets get quilting...

Cutting

1. Cut neutral fabric into 5 strips at 7 1/2".
2. Cut each strip into 7 1/2" squares. You will have 25 when done. You need 24 for HST (half square triangles) and one left as a whole square.
3 Cut 24 7 1/2" squares from the pattern fabric.
The pattern fabrics make up 6 lines. I have 3 solid lines and 3 quilted lines.

Piecing:

1. Pair up one neutral square and one pattern square, right sides together. Draw a diagonal line on the wrong side from corner to corner.


2. Sew 1/4" seam on either side of diagonal line. 
3. Cut along the middle line creating two sewn triangle pairs.


4. Press HST open, pressing seams.


5. Use square ruler to line up diagonal seam line and trim block to 6 1/2" square. Repeat for (46) HST blocks.


6. Trim single 7 1/2" square to 6 1/2" square.

Sewing together:

7. Following illustration, arrange blocks.


8. Piece blocks together into rows, left-to-right. Each row has 6 blocks and there are 8 rows.
9. Piece rows together top-to-bottom.

Finishing quilt:

10. Layer top, batting and backing together. Pin all three layers together to prevent shifting when basting. I basted the quilt by sewing the chevron lines.

11. Cut off any extra batting. I used the backing as the binding.

Binding:

12. Cut down the backing to 1 1/2" all around to be used as binding.


13. Fold backing/binding in half and press.


14. Fold backing/binding on quilt and pin.


Corner Binding


1. Fold up one side.
2. Fold corner in.
3. Fold other side in half.
4. Fold up other side to make mired corner.
5. Sew binding and enjoy.


Fluster Buster