Your Carfty Girl Header

. .
Showing posts with label Sewing. Show all posts

Tuesday, August 27, 2013

Pillow Update on a Budget


I have been busy updating my new rental home's decor. Since I can't do what I love and paint the walls, I decided to inject color with my accessories. Like you've seen in my previous posts and will soon see again, I've been inspired by the color palette of yellow, turquoise, coral and grey. It all started with this beauty.


So, off to Target I went and fell in love with their new Threshold line. It was just what I was looking for in color and design. In this post I'll share with you my first step, which was updating my boring couch pillows. 

There I was in the decorative pillow aisle falling in love, till I looked at the prices and started to do the math in my head. I wanted 9 pillows, and at a minimum of $25 a pop, that would come to at least $225 in pillows. In my head, I could hear my hubby saying, "You spent $225 on what???" So, I came up with a plan as I put those beauties back on the shelf and headed over to the kitchen aisle. That is where I found the same beautiful designs and colors in the form of napkins and placemats but at a fraction of the cost. So, $32 dollars and a little elbow grease later, I had myself 9 beautiful new pillows and was bragging to my hubby, asking him to guess how much I paid. Don't you love playing that game with your husband?


Here is my before: We got this super comfy couch at RC Willey, and it came with these blue pillows. They were nice but boring, all the same color and too dark. Can't you hear my couch screaming for help?


Here is the after. I just love the colors--they make me and my couch sooooo happy. Now, let's get started on this tutorial.


Supplies:

1. Threshold Ombre Placemat $3.59

2. Threshold Grey Placemat $4.49

3. Room Essentials Dot Napkins, set of 4 $8.99

4. Threshold Watercolor Floral Napkins, set of 4 $4.98 clearance 

5. Threshold Coral Kitchen Towels, set of 2 $5.99

6. I used 3 pillows that came with the couch to be recovered, plus 2 small long pillows I bought at DI, a local thrift shop for $4

7. Not pictured, I had 1 bag of filling from Joann for the placemat and dot pillows.

First up, is my cute coral small and long pillows.


These are a super easy sewing project. I bought a set of 2 kitchen napkins that were 28" by 18" and  I  found 2 pillows at the DI for $4 to fit inside them.

1. I folded the napkin right sides together to form an envelope pillow.
2. I pinned it and sewed straight up on both sides.
3. Turned it right side out and inserted pillow.*

*Note: If you didn't want to buy a pillow to go inside, you could complete steps 1-3, and then fill pillow with filling and hand sew the envelope opening closed.

Next up, my dot square pillows.


I bought a set of 4 Kitchen napkins that were 18" by 18". With these I made a regular pillow that I stuffed with filling I had from Joann's.

1. I put 2 napkins right sides together and pinned on all sides.
2. I sewed up all 4 sides *make sure you leave an opening to insert filling*
3. Before turning the pillow right side out, I cut the tips of the corners to help make nice, pointy corners when the pillow is filled. I then filled the pillow with filling and then hand stitched the opening closed.

Next up, my watercolor floral pillows.


I bought a set of 4 Kitchen napkins that were 20" by 20". I used the napkins plus 2 yards of scrap fabric to make 3 envelope pillows that I inserted my old couch pillows into. 

Last up, my 2 placemat pillows. These are the easiest pillows to make. 


1. I used a seam ripper to rip an opening just enough to fill the pillow--about four inches long. (Make sure your placemats have two layers, or this won't work).
2. I filled the pillow and then hand stitched the opening up.

I hope you enjoyed this tutorial. The next time you are in the market for some pillows, try checking out the kitchen section. You never know what you might find, and you might save your self some $ MOOLAH $ like I did--which of course will be used on your next DIY project.


Again here is a before shot of my living room. Soon I will share with you how I took care of my other problem spots.

1. New curtains: again, too much brown.
2. Side table: an old table that needs new life or maybe something new there all together.
3. My son's toys: OK, confession. I cleaned and removed the actual problem for this picture. That corner is usually bursting with boy toys that need some corralling.

So be sure to check back as I share those updates and as always budget-friendly solutions for home-decorating and more!


Image Map


Linked:

Sunday, June 23, 2013

Laundry Basket Makeover


Hello all, I thought I would share with you one of my quick and easy updates in my master bedroom. Now, I have one of those super ugly but oh so utilitarian laundry baskets. Don't you hate those thing you need out in plain sight but that aren't very nice to look at? Well, you can't have that. So, if you have one of those mesh and PVC monsters let me show you what you can do.


Doesn't it just scream dorm room?


AHHHHH! Much better, I had this curtain I got at Ikea in the AS-IS for $4 I used to transform my eye sore.

This curtain has tabs on the inside that I just feed the top portion of PVC pipe through. Then, I just sewed a channel on the bottom to feed the bottom PVC pipe through. I did have to cut slits in the channel for the corner PVC pipes.

If you wanted to use a piece of fabric.
1. Measure you basket, mine was 80" x 28", then add 1" to length for seam and 4" to height for channels to feed PVC in. So I would cut a 81" x 36" piece.
2. Sew a 1/2 inch finish seam on short ends. Then sew a 4" channel on top and bottom to feed PVC pipe through. When feeding pipe I would simple cut slits in channel to allow for corner pieces.


Hope you have a great week and be sure to come back to see what else I've been working on. As I type this I'm waiting for paint to dry on my next project.

Image Map


Monday, April 8, 2013

Chevron Baby Girl Quilt


I'm so excited I finished my very first real quilt and it wasn't a Pinertest fail. Yeahhhhhh. I've had a boy version of this quilt pined on my Pinertest for awhile now and have been wanting to try it. So, when I heard I had some nieces on the way I decided to jump right in and give it a try.

The quilt and free pattern: Mod Chevron Baby Quilt by Rashida Coleman-Hale.

I wanted to share some of the obstacles I had to overcome in case you have the same.

Fabric choice

What I love so much about this quilt is that it's baby without being too nursery looking. It has a bit of a retro feel. Now for me I live in a small town and we don't have a fancy fabric store. I'm thankful we have a JoAnn but trying to find like girl fabrics was an obstacle. Rashida also has 12 different fabrics which at first overwhelmed me. This is what I did to chose my fabric and how much I bought of each.

I first started by looking for a couple of colorful patterns that went together. Right away my eye was drawn to this fabric. It was perfect cause it has lots of colors to pull from. (I loved how it was girly without having pink or being to nursery like the original quilt)


I then used this fabric to find 2 complimentary fabrics and I fond these 2.


So far so good. I then took my original fabric and started to search for more solid colored fabrics. This is what I found. I was lucky to first find the purple paisley and then find they had the same paisley in green.


Yeah, I was happy with that so instead of 11 pattern fabrics in the original quilt I have 7. I purchased 1/4 yard of each except the purple, I purchased 1/2 yard. (Because this is the fabric I used as the middle big line, so I needed more of that fabric. everything else I had more then enough with 1/4 yard)

Then I searched for the base solid fabric and that was tough, but I found the beige fabric with a light pattern. I purchased 1 1/2 yards of that. So here is all my fabrics together aren't they pretty I couldn't wait to get home and transform them into a quilt.


What you need:

Neutral fabric 1 1/4 yard (25 squares)
6 Pattern fabrics 1/4 yard
1 Pattern Fabric 1/2 yard (6 squares for middle line)
Backing Fabric 1/2 yard (no piecing required)
square ruler 6 1/2" or larger
Pencil
Batting


Lets get quilting...

Cutting

1. Cut neutral fabric into 5 strips at 7 1/2".
2. Cut each strip into 7 1/2" squares. You will have 25 when done. You need 24 for HST (half square triangles) and one left as a whole square.
3 Cut 24 7 1/2" squares from the pattern fabric.
The pattern fabrics make up 6 lines. I have 3 solid lines and 3 quilted lines.

Piecing:

1. Pair up one neutral square and one pattern square, right sides together. Draw a diagonal line on the wrong side from corner to corner.


2. Sew 1/4" seam on either side of diagonal line. 
3. Cut along the middle line creating two sewn triangle pairs.


4. Press HST open, pressing seams.


5. Use square ruler to line up diagonal seam line and trim block to 6 1/2" square. Repeat for (46) HST blocks.


6. Trim single 7 1/2" square to 6 1/2" square.

Sewing together:

7. Following illustration, arrange blocks.


8. Piece blocks together into rows, left-to-right. Each row has 6 blocks and there are 8 rows.
9. Piece rows together top-to-bottom.

Finishing quilt:

10. Layer top, batting and backing together. Pin all three layers together to prevent shifting when basting. I basted the quilt by sewing the chevron lines.

11. Cut off any extra batting. I used the backing as the binding.

Binding:

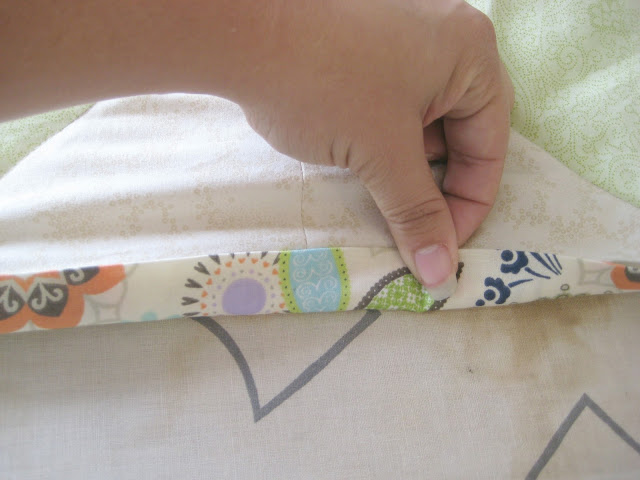
12. Cut down the backing to 1 1/2" all around to be used as binding.


13. Fold backing/binding in half and press.


14. Fold backing/binding on quilt and pin.


Corner Binding


1. Fold up one side.
2. Fold corner in.
3. Fold other side in half.
4. Fold up other side to make mired corner.
5. Sew binding and enjoy.


Fluster Buster