Your Carfty Girl Header

. .
Showing posts with label Thrift Store Find Redo. Show all posts

Tuesday, August 27, 2013

Pillow Update on a Budget


I have been busy updating my new rental home's decor. Since I can't do what I love and paint the walls, I decided to inject color with my accessories. Like you've seen in my previous posts and will soon see again, I've been inspired by the color palette of yellow, turquoise, coral and grey. It all started with this beauty.


So, off to Target I went and fell in love with their new Threshold line. It was just what I was looking for in color and design. In this post I'll share with you my first step, which was updating my boring couch pillows. 

There I was in the decorative pillow aisle falling in love, till I looked at the prices and started to do the math in my head. I wanted 9 pillows, and at a minimum of $25 a pop, that would come to at least $225 in pillows. In my head, I could hear my hubby saying, "You spent $225 on what???" So, I came up with a plan as I put those beauties back on the shelf and headed over to the kitchen aisle. That is where I found the same beautiful designs and colors in the form of napkins and placemats but at a fraction of the cost. So, $32 dollars and a little elbow grease later, I had myself 9 beautiful new pillows and was bragging to my hubby, asking him to guess how much I paid. Don't you love playing that game with your husband?


Here is my before: We got this super comfy couch at RC Willey, and it came with these blue pillows. They were nice but boring, all the same color and too dark. Can't you hear my couch screaming for help?


Here is the after. I just love the colors--they make me and my couch sooooo happy. Now, let's get started on this tutorial.


Supplies:

1. Threshold Ombre Placemat $3.59

2. Threshold Grey Placemat $4.49

3. Room Essentials Dot Napkins, set of 4 $8.99

4. Threshold Watercolor Floral Napkins, set of 4 $4.98 clearance 

5. Threshold Coral Kitchen Towels, set of 2 $5.99

6. I used 3 pillows that came with the couch to be recovered, plus 2 small long pillows I bought at DI, a local thrift shop for $4

7. Not pictured, I had 1 bag of filling from Joann for the placemat and dot pillows.

First up, is my cute coral small and long pillows.


These are a super easy sewing project. I bought a set of 2 kitchen napkins that were 28" by 18" and  I  found 2 pillows at the DI for $4 to fit inside them.

1. I folded the napkin right sides together to form an envelope pillow.
2. I pinned it and sewed straight up on both sides.
3. Turned it right side out and inserted pillow.*

*Note: If you didn't want to buy a pillow to go inside, you could complete steps 1-3, and then fill pillow with filling and hand sew the envelope opening closed.

Next up, my dot square pillows.


I bought a set of 4 Kitchen napkins that were 18" by 18". With these I made a regular pillow that I stuffed with filling I had from Joann's.

1. I put 2 napkins right sides together and pinned on all sides.
2. I sewed up all 4 sides *make sure you leave an opening to insert filling*
3. Before turning the pillow right side out, I cut the tips of the corners to help make nice, pointy corners when the pillow is filled. I then filled the pillow with filling and then hand stitched the opening closed.

Next up, my watercolor floral pillows.


I bought a set of 4 Kitchen napkins that were 20" by 20". I used the napkins plus 2 yards of scrap fabric to make 3 envelope pillows that I inserted my old couch pillows into. 

Last up, my 2 placemat pillows. These are the easiest pillows to make. 


1. I used a seam ripper to rip an opening just enough to fill the pillow--about four inches long. (Make sure your placemats have two layers, or this won't work).
2. I filled the pillow and then hand stitched the opening up.

I hope you enjoyed this tutorial. The next time you are in the market for some pillows, try checking out the kitchen section. You never know what you might find, and you might save your self some $ MOOLAH $ like I did--which of course will be used on your next DIY project.


Again here is a before shot of my living room. Soon I will share with you how I took care of my other problem spots.

1. New curtains: again, too much brown.
2. Side table: an old table that needs new life or maybe something new there all together.
3. My son's toys: OK, confession. I cleaned and removed the actual problem for this picture. That corner is usually bursting with boy toys that need some corralling.

So be sure to check back as I share those updates and as always budget-friendly solutions for home-decorating and more!


Image Map


Linked:

Sunday, June 23, 2013

Laundry Basket Makeover


Hello all, I thought I would share with you one of my quick and easy updates in my master bedroom. Now, I have one of those super ugly but oh so utilitarian laundry baskets. Don't you hate those thing you need out in plain sight but that aren't very nice to look at? Well, you can't have that. So, if you have one of those mesh and PVC monsters let me show you what you can do.


Doesn't it just scream dorm room?


AHHHHH! Much better, I had this curtain I got at Ikea in the AS-IS for $4 I used to transform my eye sore.

This curtain has tabs on the inside that I just feed the top portion of PVC pipe through. Then, I just sewed a channel on the bottom to feed the bottom PVC pipe through. I did have to cut slits in the channel for the corner PVC pipes.

If you wanted to use a piece of fabric.
1. Measure you basket, mine was 80" x 28", then add 1" to length for seam and 4" to height for channels to feed PVC in. So I would cut a 81" x 36" piece.
2. Sew a 1/2 inch finish seam on short ends. Then sew a 4" channel on top and bottom to feed PVC pipe through. When feeding pipe I would simple cut slits in channel to allow for corner pieces.


Hope you have a great week and be sure to come back to see what else I've been working on. As I type this I'm waiting for paint to dry on my next project.

Image Map


Monday, June 10, 2013

Jute Sign Tutorial


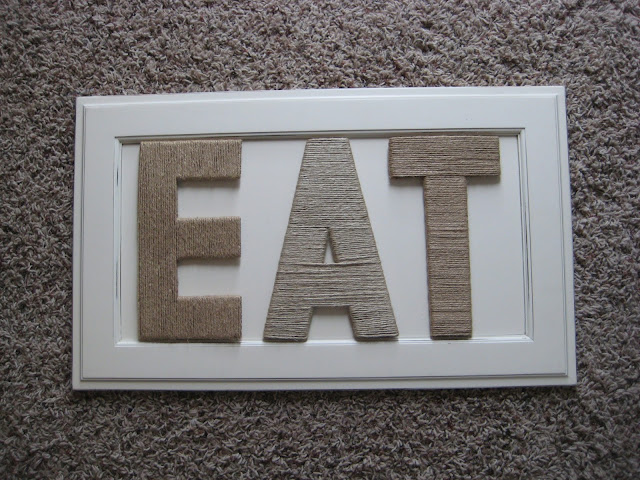
Wow,it has been awhile, I've been out in my garage working on some great projects. Here is the first of many I would like to share with you. This DIY sign cost me less then $3.50 to make. Well... let"s get started.


First. I took this regular cardboard box and cut out a panel. I then drew out my EAT sign.


Second. I used a utility knife and big ruler to cut out my letters.


Third. I bought a roll of Jute @ Home Depot for $1.50. I used it to wrap each letter.


Fourth. I attached the Jute wrapped letters onto a old cabinet door I got @ a salvage yard for $2.00.


Voila... Easy & cheap DIY project just the way I like it. Can't wait to show what else I've been working on. Hope to see you soon. Happy crafting!


Image Map

Linked @
bebetsy.com/

Wednesday, April 17, 2013

Kitchen update: Toaster Redo


I've been busy working on my kitchen and living room and soon you will see more, I'm almost done. I rent this beautiful house ,so unfortunately I can't paint and if you know me you know how much that is killing me. After our first white winter here in Utah I'm in need of color, so nothing is safe in my house right now and this toaster was the first thing to get taken over by my spray can.


Here is what I have to work with it's not bad but it needs some color. That yellow vase by the sink is what started it all. My friend gave it to me before she moved to sunnier pastures....take me with you. I didn't realize how much I liked yellow.


Look at Mr. Toaster just sitting there so sad, so white, he didn't see me coming.


I tapped up the parts I didn't want yellow and sprayed away with Krylon Sun Yellow. I was so glad that it came out and didn't turn out to be a fail. My husband came home and right away said "WOW!, that's yellow!" Mr Toaster is much happier now, wait and see what else fell victim to my spray can.


Image Map


Tuesday, October 16, 2012

Before & After Filing Cabinets


So I was in search of a new desk and while checking my favorite site, craigslist. I came across these beautiful filing cabinets. What made them beautiful you ask? They where only... wait for it... 5 bucks for the pair. Love it perfect for me to work my magic.


After paint and a desk top here is my new custom desk. Ta da...


I used the same painting technique I used on the dresser and vanity. What can I say I love that old vintage look and the big plus is in a house with kids this look is great, cause the more they use it the more vintage it looks. "That's not a scratch it's just more character." If you want the painting steps look here. I even used the same spray paint Rust-Oleum Satin Espresso and Vintage White.

Note: When painting the drawers I covered the inside of the drawers with garbage bags. I didn't want to waste time or paint on the inside of the drawers.


I did get to reuse the hardware on this project. As you can see they started out brass. I tried hammered platinum but then settled on using the Rust-Oleum Satin Espresso. Just sprayed it on. Note: I did put the screws in the hardware when I sprayed it so they would be brown too.


When I was done I took a lovely drive to one of my favorite places Ikea is it just me or does everyone hear angels singing when you hear the word Ikea? OK just me. So as I ate my dollar ice cream and hot dog, I purchased the top for my desk. I went with the Vika Amon 78 by 24 that was normally $45 but the as-is gods were looking down on me and I found one there for 20 bucks wooo hooo.


So $25 bucks later I had myself a perfect custom desk. It fits the odd space I had planned for a desk. It has tons of practical storage. And last but not least it looks like a beautiful piece of furniture and not an ugly piece office furniture.


Hope your inspired to refinish something. Let me know how it goes and don't forget to leave a comment.

Image Map

Visit thecsiproject.com

Monday, September 17, 2012

Before & After Cragslist Finds


So now that I have more time on my hands and I'm in need of some new decorations for our new home in Utah. I have become a little bit addicted to cragslist and the distribution center, don't judge me... I love finding something real cheap that has hidden potential. Then using some elbow grease to create something unique. Here are two of my recent purchases.


So I needed a new vanity and there it was on cragslist for $15 oh yeah that baby was mine.
After some elbow grease and some paint here is what I got.


Next, I found this great dresser for $10. When I saw it I fell in love with the vintage look. Not so much the color. Remember you need to look beyond the paint and see the bones of the furniture.


From this ugly painted Forrest green monster to this...


So I used the same painting technique on both pieces to get that old worn vintage look.

With the dresser I did start differently, as you can see someone painted it green and didn't do a good job. First, I tried sanding it but then I went to Home Depot and got some paint stripper. Let me tell you that stuff is amazing. I got the spray, I just sprayed it on and like 3 min later the 3 layers of paint just scraped right off. It actually was kinda of fun peeling it off, like peeling off a sunburn.  After that this is what I did to get that fabulous paint job...

First. I painted the furniture a base coat, that will later show through the top coat, I used Rust-Oleum Satin Espresso. I used spray paint on both pieces of furniture, cause I wanted a clean finish. But you can use any kind of paint.


Second. I took Vaseline and put it on the parts I wanted the brown to show through. So it looked old and vintage.

Third. I spray painted on the top coat. I used Rust-Oleum Satin Vintage white.

Fourth. I used my finger nail to scrap off the top coat where I applied Vaseline. Then I used a sanding block to rough up the edges. The more you sand the older and more worn it looks. When sanding think of how the furniture would naturally wear.

Fifth. I did spray a top coat on the top of the dresser and vanity, cause I knew that was going to be wiped down the most.

Sixth. I installed the handles. For the vanity I wanted the pop of color so I got these pretty green porcelain knobs at Hobby Lobby. For the dresser I really wanted to salvage the original handles but those ugly layers of paint did not want to come off. So I got these vintage looking handles from Home Depot.

Thanks for looking, let me know how your Redo projects go.

Image Map


Visit thecsiproject.com