Your Carfty Girl Header

. .

Sunday, March 24, 2013

Adventures in Blogging #3

#3 Design Elements

So, I've gotten a few questions on my blog design. No I didn't use a designer just a lot of trail and error. (lots of choice words yelled at my computer)

1. I used great tutorials from Ashton at Something Swanky, She has a few DIY Design post you should check out.

2. She suggested to have a second blog, you use to host your blog pictures and design elements. A blog just for your eyes. I do that and love it, I often use it to test out things without worrying it will mess up my blog. 

3. Header  
I followed Ashton steps in; How to Create Your Own Social Media Icons, Make A custom Header and How to link multiple URLs to One Image. I also got my social media icons from Carrie at CarrieLoves.

A. I used PicMonkey to create my header, which includes my header, media icons and NavBar all together as one picture. 


B. I then posted the picture on my test/design blog to get the URL, so I could load it up to Image Maps. I used Image maps to link all my social media icons and NavBar (pages) to the one picture. I then got my HTML code and posted that to my test/design blog.

note: Make sure you link your main blog page to your header. So when you click on the feet picture or family picture you get taken to my main blog page.
Also, when linking the mail social media button use mailto:yourcraftyfriend@gmail.com, of course change it to your email address.

C. I then used the steps in Make a Custom Header to get rid of the generic header and NavBar in blogger and install my custom mapped header.

4. Signature
I used PicMonkey to make My Signature as a image. I used Image Maps to link my social icons. I then posted it to my test/design blog for easy access to it when I create a post. 


Image Map

5. About
My about me was created in PicMonkey. I first went into create a collage and added the pictures and where the words are I left blank. I saved it like so.
Then went back into PicMonkey as edit picture to add words to give me this.


Tip: I went into my template (template - customize - advanced) to get the exact colors of my background and I use them in all my blog design elements to keep my blog looking cohesive. For example I found my blue to be #35b8c3 and when I'm in Picmonkey I can click on the color and enter in #35b8c3.

I hope this info helps you. If you have any questions on any of it please ask. Happy Blogging.

Image Map

Thursday, March 21, 2013

Target Trip 3/20


Got to go into town yesterday and of course one of my stops was TARGET. Well, I was on a mission and not only did I complete my mission but I got Brownie points. My son has a birthday party on Saturday and I needed a boy present. My present supple is running low since the move. Well, today I replenished my supply. Target clearance was overflowing with gems I had to stay focused. I found these gems in the 70% clearance.  Not only did I get future presents but as spring break and summer approach, these will be great to entertain my daughter. (Money well spent!!!)

Customize Skateboard Regularly $19.99/ Sale $5.98
Store & Create Caddy Regularly $12.99/ Sale $3.88
Create Bangles Regularly $9.99/ Sale $2.98
Bling Blocks Jewelry Regularly $9.99/ Sale $2.98
Candy Wrapper Jewelry Regularly $9.99/ Sale $2.98
Chat Beads Jewelry Regularly $4.99/ Sale $1.48
Pearls & Charms Jewelry Regularly $5.24/ Sale $1.57
Gift Wrap Regularly Regularly $3.99/ Sale $1.18
Gift Wrap Regularly Regularly $4.14/ Sale $1.24
9 items =
Bottom Line Regularly  $81.31/ Sale $24.27

So check out you local Target, I hope you have success, Happy Shopping.

Image Map

Adventures in Blogging #2


#2 Success

So, last week I had my melt down, blogger overload, but this week I regrouped and had some success I would love to share with you.

1. I successfully completed step 6 "Make sure you gain Google authorship" in 8 Tips to Maximize Your Google+ Presence by Jenny @ The NY Melrose Family.

2. I read and successfully completed, How to Verify your blogger blog on Pinterest by Jamie @ Scattered Thoughts of a Crafty Mom. She has a great tutorial and if I can do it without a hitch, there is a good chance you too can have success.


3. My blogging has allowed me to reconnect to one of my very best friends, Lisa. She too has started blogging and it has been great to grow together. It's so nice to rant to someone who knows exactly what you are talking about and feeling. She has started a GREAT Blog that is a great resource for Celiacs, The Everyday Celiac, I'm so impressed and excited about how many people it will help. She also is working on a personal blog, that I can't wait to check out.

4. On a personal note I made it through a week of exercise at the hands of my new TRAINER. Well, I decided I wanted to get back into shape, swimsuit season is fast approaching  So I decided to ask my husband to help me out. I asked him to be like mean personal trainer, something like Jillian. Boy I didn't think he would have such joy rising to the occasion. He defiantly channeled his basic training days, but I got what I asked for. 

Hope you have some success this week, Happy Blogging.


Tuesday, March 19, 2013

Easter Sign


Walked into Target and Easter was in the air. In the dollar section were these cute bunny ears which inspired this craft. You can look at Halloween Letter Craft for tutorial on how to make. Have fun crafting...


The Paper is from a all season stack from Hobby Lobby. I used Easter eggs, grass, ribbon and rhinestones to embellish the sign.


Of course the cute bunny ears have center billing on top of the O.


I found these cute little chicks at Micheals. I used a 1/4 yard of furry green fabric as the grass.

Image Map


Sunday, March 17, 2013

Adventures in Blogging #1


#1 Has she gone crazy.

So, I have really started to commit to my blog and start getting it out there. I moved from Arizona and all my family and friends to a small town in Utah. Overnight I had lots of time on my hands and nothing really to fill it. I love to do anything and everything crafty. So, I thought I would begin blogging to stay connected and to share my work. Anyway, if you're a blogger you understand the mountain you have to climb to get from point A to Z.

It's been a few months and WOW I have come along way. I have a few more ups then downs, but man the downs are a bummer. Thursday I hit my blogging overload... Have you been there? I feel like I was on information overload. I'm so thankful for so many great bloggers sharing great info, but I was in the middle of reading this great post, 8 Tips to Maximize Your Google+ Presence by Jenny @ The NY Melrose Family.


Something I knew nothing about before blogging. I finished reading step 1 and it went over my head. I could understand the words, but at first I couldn't figure out what she was saying to do. UGHHHHH! I began yelling at my computer as if that would help. My husband was looking at me like I had gone crazy. And there it was the start of my melt down. I was tired of reading something great, that made me realize I was doing things wrong, yet again.

So, my husband slowly approached me like I was a wild animal and ask, "What is wrong?" (bless his heart I'm sure he wasn't expecting what followed. I began ranting and ranting and ranting. Spitting out random words like SEO, Pin it Button, Link Party,Google+, that made him go WHAT????  He really had to talk me away from the edge. He helped me regroup and focus on why I was blogging. To connect, to create friendships, to share. He asked me to set 1 goal to work towards. So, I looked at him and said I want more followers, my first goal is 15. He then RAN out the door to work. (Just kidding backed away slowly I could attack again)

This is why I have a great husband. Later that day I logged on my blog and saw I had 2 more followers. I jumped for joy and as I looked to see who these lovely people were. I saw one of them was my husband. He just made me smile and believe he would do anything to make me happy.

Image Map

Thursday, March 14, 2013

10 Year Anniversary


Wow, today is my 10 Year Anniversary with the love of my life. Where has the time gone, I really do feel like the time has blown by. It felt like yesterday I was just hanging out with the "Quad" and bang... I have a 9 year old daughter and 7 year old son and live in Utah (thought that would never happen... never say never!) It has been a roller coaster ride for 10 years, ups and downs, laughs and cries and sometimes screaming, but as we stop here at 10 years. I say, "I want to ride it again." So hopefully another 10 years... and then another 10 years... till we reach eternity.

I love the church saying "I never said it would be easy, but that it would be worth it." I know that often applies to life, but I equally think it applies to marriage.

I really do have a great husband; he came home last night with some tulips (my favorite flowers). Today, we went to lunch before he went to work and even though we didn't do something spectacular it was so perfect. Because, I felt like after 10 years, my husband is my best friend and no matter what we do, it's great. (We did make out so it was better than great)

Image Map

Tuesday, March 12, 2013

Mint Oreo Brownies


Yummy green dessert for St. Patty's Day, but no matter when you make these they will be a hit. I always get rave reviews for these and after making them once. I get requests to make these over and over. My husband's Job always requests these, I'm starting to think they are making up potlucks to get these.

Let's get baking...


What you need:
Your Favorite Brownie Mix
Oreo Cookies


First. Mix Brownie mix according to box.


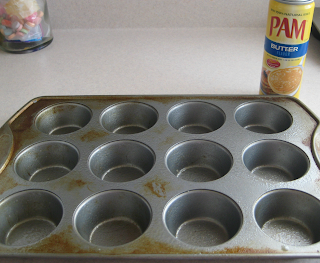
Second. Drop in Oreo cookies (I do about 3 at a time). Then coat Oreo with the brownie mix and pull out and drop in greased cupcake pan. 


 It may not seem like you have enough brownie mix but your good.


Third. Bake at 350 for 15 min. Take out of oven and allow to cool. I then use a knife to scrape along the rim for easy removal of Oreo brownies. Makes 2 dozen brownies.


I love to watch the surprise on peoples faces as they take a bite out of the brownie and find the wonderful Oreo surprise in the middle. Hope you enjoy this recipe. Let me know how you like them.


Image Map


Monday, March 11, 2013

Temple Bracelet


So one of my favorite gifts is from my BFF Melissa, She made me a Temple bracelet. I keep it in my Temple bag and love to use it. So, when I heard both my Sisters-in-Law were going through the Temple, I knew exactly what I wanted to make them.

What is a Temple bracelet? It is a pretty bracelet that has a clip attached to hold your Temple name slip while doing a session.

What you will need :

white and clear beads
badge clips
jewelry ring
stretchy cord


First. I take the plastic part off the badge clip and attach a jewelry ring to clip.

Next. String beads and clip onto stretchy cord and knot to close.

Then you are done, so easy, enjoy. I know my Sisters-in-law are going to love it.

Thanks for visiting I would love to see how yours comes out.


I had such a wonderful weekend, I got to drive down to Arizona and be with my two sisters-in-law as they got to go through the temple. It was a beautiful day one that will forever be in my memories.

Don't you love those days that are filled with meaningful conversation, roaring laughter, good food and above all the spirit. Also, they loved the bracelets you can see them wearing them in this beautiful picture we took right before we went to the Mesa Temple.


Image Map


Thursday, March 7, 2013

Crockpot Apple Pie


Today, I made my favorite crock-pot recipe, Crock-pot Apple Pie.

I love this dessert recipe because I get to use my food storage and crock-pot to produce yumminess.


You'll need:

5 cups de-hydrated apple
5 cups water
6 tablespoons sugar

For Strudel
2 cups regular rolled oats
2 cups packed brown sugar
1 cup flour
1 teaspoon cinnamon
1 cup butter


Mix apples, water and sugar in crock-pot.


Mix all the strudel ingredients in a bowl.


Stir 1 cup into the apples.


Sprinkle the rest of the strudel on top of the apples.


Put on high for about 2 hours, till most of the water is gone. Take lid off for 15 minutes.

I love to top mine with ice cream and enjoy.


Image Map